Thursday, October 31, 2013

When to Plant a Vegetable Garden in Missouri

When to Plant a Vegetable Garden in Missouri

Planting a vegetable garden in Missouri can be rewarding thanks to a relatively warm climate and a growing season that lasts from about April to October. But the variety of climates and temperature zones in the state can make it tricky to know when to start your vegetable garden. Does this Spark an idea?

Missouri planting climate

    During growing season, Missouri gets between 60 and 90 days that are warmer than 86 degrees Fahrenheit.
    Missouri generally falls under Zones 5 and 6 on the USDA Plant Hardiness Zone Map, but the University of Missouri Extension divides the state into three areas, North, Central and South, in determining planting dates for vegetables. The Ozark plateau region also falls under the "North" planting categorization, even though it's in a more southern part of the state, due to its elevation.
    Planting times in each of these areas is affected by temperature and the date of the last frost. The southern part of Missouri has an average frost-free date of April 5. In northern Missouri, the average frost-free date is typically April 20, though the University of Missouri Extension notes that frost can hit until mid-May.

Missouri planting times

    Planting dates vary by vegetable variety. The University of Missouri Extension offers a vegetable planting calendar that details planting dates for each vegetable based on region.
    Cold weather crops, such as beets, carrots, lettuce, peas, cabbage and cauliflower can be planted in March in the southern region. In the north, they can be planted in April, and in the central region they can be planted from mid-March to mid-April.
    Beans and cucumbers should be planted in mid- to late-April in the south and mid- to late-May in the north, and hey should be planted in early May in central Missouri.
    Warmer weather crops, such as peppers, squash and tomatoes, can be planted in May in the south, mid-May in central Missouri, and mid- to late-May in the northern region.
    Sweet corn can be planted from late April to mid-August in the south, from late April to early August in central Missouri and from early May to mid-July in the north.

Fall crops

    Several varieties of vegetables can be sowed a second time for fall harvest. These dates are also listed on the MU Extension planting calendar. Beets, for example, can be sown from Aug. 1 to 15 in the south, Aug. 1 to 10 in central Missouri and July 25 to Aug. 1 in northern Missouri for a fall crop. Cabbage and carrots can be planted in early August in the south, in central Missouri from late July to early August and in late July in the north.

How to Start a Vegetable Garden

How to Start a Vegetable Garden

Eating fresh-picked corn or vine-ripened tomatoes is a life-altering experience. But where do you start? How do you choose from racks of seeds, catalog after catalog and rows upon rows of nursery seedlings? Successful small-scale farmers know what and when to plant, and how to start the crops.

Instructions

    1

    Grow only those vegetables you enjoy eating. Give priority to those prized for incredible flavor when eaten fresh from the garden: sweet corn, beans and peas, tomatoes and young spinach, among others.

    2

    Prepare a plot of flat ground that gets full sun nearly all day. Break up and turn the soil and add compost or other organic material (See How to Buy Soil Amendments). A full day of blazing sunshine is especially important if you grow vegetables in the cool weather of early spring, early fall or winter.

    3

    Figure out how much growing space you have and plant accordingly. Lettuce, for example, can be grown in a solid mat, but tomatoes need to be spaced about 2 feet (60 cm) apart. Give pumpkins at least 4 feet (120 cm) of growing room. Growing requirements are provided on seed packets, in catalogs, and on nursery tags, as well as in books on growing vegetables.

    4

    Choose crops that require less room if you have a small vegetable garden or grow vegetables in a container. Lettuce is a great pot plant, and 'Patio' or 'Tumbler' tomatoes will grow well in a hanging basket. Plants that climb and vine, such as cucumbers and pole beans, can be trained up a trellis to take up less room horizontally. Tuck herbs and parsley into flower beds.

    5

    Schedule plantings around the two main growing seasons which vary by region: cool (spring and fall) and warm (summer). Common cool-season vegetables include beets, broccoli, cabbage, carrots, cauliflower, lettuce, peas, potatoes, radishes, spinach and turnips. Warm-season crops include beans, corn, cucumbers, eggplant, melons, peppers, pumpkins, squash and tomatoes.

    6

    Sow some seeds directly in the ground as they grow best that way: beans, beets, carrots, chard, corn, lettuce, melons, peas, pumpkins, squash and turnips. Starting seeds is, of course, much less expensive than planting seedlings sold in flats, packs and pots.

    7

    Start with nursery seedlings of certain other crops unless you are an experienced vegetable grower. These plants tend to do better when set out in the garden as seedlings: eggplant, peppers, tomatoes, broccoli, cabbage and cauliflower. Squash and cucumbers are among a few you can plant just as effectively as either seeds or seedlings.

    8

    Buy seeds at nurseries or by mail order starting just after the New Year, when the selection is freshest. Look for seed packets marked as having been packed for the current year.

    9

    Buy vegetables online and from mail-order seed companies for a far greater selection than you'll find at neighborhood nurseries. Burpee (burpee.com), Johnny's Selected Seeds (johnnyseeds .com), Park Seed Company (parkseed.com) and Thompson and Morgan (thompson-morgan.com) are a few long-established sources.

    10

    Shop for seedlings when your soil is prepared and you are ready to plant. Keep them moist and don't let them sit around for more than three days. Buy healthy and vigorous seedlings. They should stand up straight and be stocky, not lanky, with no yellow leaves or bug holes.

    11

    Save money and get truly involved with your garden by starting seeds indoors in winter and transplanting them into the garden in spring. It's simplest to start with complete kits, sold at garden centers and through catalogs, containing fluorescent lights, soil mix, containers and watering devices.

    12

    Sow seeds of colorful radishes or giant sunflowers to introduce children to the satisfaction and fun of growing their own food. Or lean 3 stakes together, tie them together at the top, and train pole beans up the stakes. Voila! A bean teepee.

Little to No Money Garden Ideas

Little to No Money Garden Ideas

In "The Dirt-Cheap Green Thumb: 400 Thrifty Tips for Saving Money, Time, and Resources as You Garden," Rhonda Massingham offers hundreds of tips and ideas for gardening on the cheap. She explains frugal gardening techniques such as planting perennials in the landscape, composting to build garden soil and saving seeds. Whether you live in a small condominium with minimal outdoor space or in the country with acres and acres of land, you can garden economically with little to no money. Does this Spark an idea?

Assess Your Area's Microclimates

    Before planting the first seed or seedling, take a little time to assess your growing spaces. If you have nothing more than a 10 x 12-foot cement patio outside your condominium door, think about what you will grow there and how you will do it. Will you use large wooden planter boxes and trellises? Will you use several large plastic patio planters? Do you want tomatoes, peppers and onions or just flowers? What kind of and how much sunlight does the area receive daily?

    If your planting area is a large outdoor space, review the same kinds of things, such as sunlight and shade, as well as what is already growing, soil type and water sources. Sketch the area with brief notes and list what you would like to grow. This gives you a starting place to plan before you spend any time or money on gardening.

Borrow or Rent Gardening Equipment

    If you need to dig up a section of sod for planting, ask friends and family about borrowing a rototiller or good garden spade and wheelbarrow. If you can't borrow from anyone, check out local rental sources and consider renting. If you prefer to own the equipment, look for good used equipment to purchase instead of buying a new rototiller or leaf shredder. Garage sales, local classifieds and Craigslist are very good sources of used lawn and garden equipment.

Grow What You Like to Eat

    Grow fruits and vegetables your family likes to eat. It is a waste of garden space and gardening resources to grow brussels sprouts if no one will eat them. If you like fresh tomatoes in your salad or have a favorite salsa recipe, growing tomatoes is a good choice

Grow Herbs

    Herbs are some of the most cost-effective plants to grow in the garden. Fresh herbs garner premium prices in grocery stores and at farmers' markets yet cost just pennies to plant, pick and use. An added benefit is the health benefits of using fresh, organically grown herbs you grow yourself. Easy and inexpensive herbs include basil, parsley, cilantro, dill, fennel, lemon balm, mint, thyme and oregano. For under $3 per pack, you can grow fresh basil all summer long.

How to Clean and Maintain Outdoor Furniture

How to Clean and Maintain Outdoor Furniture

The ideal spring cleaning routine includes special attention to furniture dedicated to the patio, gazebo, playground, garden and yard. Outdoor furniture is usually made of durable materials like metal or plastic, but being constantly exposed to the elements it can quickly rust, gather dirt or weaken and deteriorate. Here are quick and easy ways to clean and maintain furniture that is designated to enhance our outdoor experience. Does this Spark an idea?

Instructions

    1

    Brush away dirt particles including leaves, flowers, branches and dried bird droppings. Use a handy nylon-bristled brush or broom. If you have a leaf blower, this will work well to blow off fallen leaves and accumulated dust and dirt.

    2

    Hose away stuck-on dust and dirt. Use the garden hose to quickly wash away all the grime, animal-related droppings and residue, as well as plant-related sap and stains.

    3

    Scrub off stubborn grunge. Use soapy water (warm water with dishwashing detergent) and a nylon-bristled brush or old toothbrush to scrub off any filth or stain that didn't come off with the hosing down. Rinse with clean water.

    4

    Clean, polish and protect aluminum furniture with a soft cloth dipped in water-and-vinegar solution. Avoid abrasive materials that can scratch the aluminum.

    5

    Polish and protect metal and plastic furniture with a couple of thin coats of car wax on all the exposed areas.

    6

    Protect wood furniture by repainting as necessary. Consider sealant treatments used to waterproof wood decks and patios.

    7

    Check the integrity of painted metal furniture. When rust develops or when bubbles and irregularities appear on the painted surface (indication that rust is developing underneath the paint), consider restoration before the situation worsens.

Wednesday, October 30, 2013

How to Grow Phlox Subulata

How to Grow Phlox Subulata

Phlox subulata is also known as Creeping Phlox, Moss Phlox. This perennial plant is cold-hardy to zone 3 and hardy for zones 3 to 9. Phlox subulata can be purple, white, pink or blue. Phlox plants grow up to six inches tall when in bloom and 2 to 3 inches tall when not in bloom. Phlox will spread out in a 1- to 3-foot wide mat, covering the ground. Phlox subulata can be used in rock gardens, along the edge of sidewalks, on a sloping lawn, along the border in a garden or even in a container garden. Phlox grows with minimal care, and will brighten your garden with its colorful blooms each spring. Does this Spark an idea?

Instructions

    1

    Pick an area of the yard or garden that has well-drained soil and full sun. In warm or hot regions, phlox should get partial shade in the afternoon.

    2

    Plant creeping phlox before the last frost in spring and in the fall in warm regions.

    3

    Start seeds indoors 7 to 8 weeks before the last frost in spring. When planting in the garden, space seedlings about 17 to 18 inches apart.

    4

    At planting, water phlox subulata until soil is moist, then keep soil moist as the plants establish their roots.

    5

    Fertilize phlox with a time-release fertilizer. Add mulch around the plants after fertilizing.

    6

    Prune phlox stems back by one-third to one-half after the spring bloom to encourage new growth.

    7

    Watch for spider mites in hot, dry areas, and foliar nematodes when the area is always wet or there is high humidity.

Botanical Serigraphs: The Gene Bauer Collection


Special Offer: check this out!

Related Products

    Product Description
    Botanical Serigraphs: The Gene Bauer Collection features serigraphs and narrative text from handcrafted, limited-edition booklets about arboreta and gardens throughout the state of California. As an avid member of the California Garden Club in the seventies, Bauer dedicated herself to creating a series of booklets to capture the experience of touring gardens found in the club's districts. With a mission to better acquaint people with gardens in the area, Bauer createdsixty-one issues of these booklets, which she mailed to club members. Botanical Serigraphs was made possible because original recipients and collectors of the booklets returned them to Gene after her personal collection of booklets was destroyed in a 1997 wildfire. Her attention to detail and keen sense for the extraordinary makes this book an excellent gift for artists and garden enthusiasts alike.


    Gifts & Decor Slumbering Gnome Garden Statue


    Features
    • Delightful slumbering gnome statue made from polyresin
    • Brings a touch of storybook whimsy into your decor
    • Kids and guests are sure to adore this statue
    • Dimensions: 12 inch x 5 inch x 10 inch high
    • Excellent gift for housewarmings and get-togethers

    Special Offer: check this out!

    Related Products

      Product Description
      After a long day's labor tending the garden, a rosy-cheeked gnome settles into his favorite hammock to enjoy a well-earned rest. Indoors or out, this fanciful statue adds a witty bit of humor that's sure to warm the heart of any hardworking gardener. Polyresin. 12-inch x 5-inch x 10-inch high.


      How to Get Rid of Stink Bugs and kill Stink Bugs in your Home and Garden

      Stink bugs can become a major pest in people's homes and if you have ever grown tomatoes then you know what a pest they can be in the garden. There are steps to take and products to use, to help control stink bugs and prevent sting bug damage to fruits and vegetables. There are also things you should not do when trying to eliminate these insect pests. Does this Spark an idea?

      Instructions

        1

        Learning stink bug habits and about their life cycle is an important first step to controlling stink bugs. Adult stink bugs can live for several years, going dormant during periods of colder weather after they have sought out warm places to hide. The females, when they emerge in the spring, lay clusters of eggs, from 30 to 100, on the undersides of leaves on low growing vegetation. There can be up to 4 generations a year in warmer climates with the young stink bug nymphs going through 5 instar stages, molting their soft external skin after each stage. The adults have a hard waxy, outer covering with fully formed wings and powerful stink glands. This shielding is part of the reason it is hard to kill stink bugs with many chemicals. Strong fliers, stink bugs are attracted to lights and have sharp sucking mouthparts. There are hundreds of types of stink bugs found in North America with some of the worse pests not being native, but coming from Asia. The four best known garden and home pests are: the green stink bug, the brown stink bug, the southern green stink bug, and the marmorated stink bug (a fairly new introduction to the northeast). When feeding they inject the fruit or plant with saliva before sucking out the plant juices through their needle like mouthparts. They can cause plants to be stunted, fruits to be misshapen and discolored, and spread some plant diseases. During the winter months, in colder climates, they can invade warm houses in large numbers. Even with all their hardiness, killing stink bugs and preventing stink bugs from entering your home is possible.

        2

        Keep your garden area clean. Because stink bugs like to lay their barrel shaped eggs on pre-existing plants, it is important to clean up weedy areas in your yard and to remove stink bug hiding places. The females become active once the temperatures start hitting the 70's so watch for egg clusters and any laying females to destroy. Don't crush the adults as that will release their fowl odor which will actually attract more stink bugs. You can kill stink bug adults by knocking them into a container of soapy water. A long stick with a small mirror attached is good for checking the lower area of plants for egg clusters. Preventing that first generation will go a long way toward safe guarding your garden, but it won't totally solve the problem.

        3

        Use some of the non toxic methods to control stink bugs. Stink bugs are strong fliers and will travel to find a food crop, so not only will you have to fight those breeding in your yard but incoming ones also. There are some non toxic methods to fight the bugs that come into your garden. One way to protect your crop is the use of row covers for crops such as peas and beans. Besides handpicking the stink bugs you can also use a small cordless hand vacuum to suck them up before dumping them in some soapy water. Stink bugs are attracted to the color yellow and at some of the garden supply sites you will find yellow sticky traps for trapping stink bugs and pheromone impregnated traps that will lure them in. Starting the battle early, before you actually see adults is important because the young nymphs can cause feeding damages as well. Don't plant sunflowers near your garden as stink bugs are highly attracted to them. They can be used as a trapping crop to lure the stink bugs away from your garden where they can be sprayed with stronger chemicals without worry.

        4

        Resort to the right toxic insecticides if you have to. There are insecticide sprays and dusts you can use to kill stink bugs, unfortunately the hard covered adults can be hard to kill. Because they feed on internal plant juices, topical stomach poisons sprayed on the plant surface won't kill them. Contact insecticides including Carbaryl, Permethrins, and Sabadilla, are effective, especially against the young nymphs. Malathion, Pyrethrin, and Endosulfan based pesticides have all been shown to kill stink bugs. Neem oil has been found to have little effect on stink bugs. Diatomaceous earth will kill stink bugs and there are products that contain it along with Permethrins for a double knockdown. Read and follow all label warnings and directions when using insecticides and reapply them as called for to control stink bugs. Nicotine will also kill stink bugs when sprayed on them. To make your own spray crush up about 10 cigarettes in a half gallon of water and let it sit over night. Strain the solution through some cheesecloth saving the liquid and adding a teaspoon of dish soap to it. This can be sprayed on plants and it will kill stink bugs quickly, just be sure to thoroughly wash any edibles you get it on and to not get it on yourself. Insecticidal soaps will also work on stink bugs but be careful if you try to use regular liquid soaps. Some dish washing or hand soaps can be too strong and can burn plants.

        5

        Prepare your house to keep stink bugs out of it. Many people have been surprised to find large numbers of stink bugs in their house during the winter and early spring seasons. These are the overwintering adults, mainly females and the more of them you can destroy the fewer you will have to worry about next summer. To keep them out of your house, be sure in the fall that you check for any entry points stink bugs may find. Caulk around all windows and door frames, use window screens and repair torn ones, replace or repair loose siding or bricks, check your attic vents and install screens there, and if you have a crawlspace be sure any incoming pipes and duct works are sealed around. Any stink bugs you find in the house can be vacuumed up or killed with insect spray, but do not crush them or you will release their bad odor. Fumigants can be used to kill stink bugs in attics and other rooms but the dead bodies need to be cleaned up or they will attract other insects such as dermestid beetles. Finally since they are attracted to lights being sure that yours are turned off at night is a good idea. Under resources below are links to other articles about insect pests and controlling them. Check them out and please rate this article and any others you read, thank you.
        All contents copyrighted by Aupoet.

      The Best Wood for Outdoor Projects

      Before selecting a type of wood for your project, consider the climate it will be exposed to. A dry environment may require different wood than you would use in a wet environment. The durability or longevity factor should be another consideration. Is the structure temporary or are you building it to last? The cost of natural woods is directly related to their longevity in outdoor conditions. Does this Spark an idea?

      Redwood and Cedars

        Redwood with a deep rich color has a high resistance to insect activity and water penetration. Lighter grades of redwood may be fine for decking and handrails. The higher quality redwood should be used for furniture. Cedars, both western and eastern types, are excellent woods for outdoor projects. Western cedar typically has a full red color throughout. Eastern red cedar will have white sapwood along its edges. The sapwood will rot if not treated with sealant. In general, the more natural red color to the three types of woods, the higher the cost. Both types of cedar will gray out in full sunlight and will need to be treated with a penetrating oil to preserve color.

      Cypress

        Grown in swamps and sometimes pulled from southern rivers, cypress is a wood that can withstand almost any environment. Cypress is a close-grained wood with a yellow to white surface. Extremely resistant to rot, the wood will turn to a dark shade of gray when exposed to rain and sunlight. The wood can be treated to retain some of its color, but most sealants will eventually allow the surface to gray out over time. The cost of cypress boards varies greatly depending on availability. Most cypress is collected when swamp waters are low enough to allow access for harvest. Old logs pulled from rivers are treated like exotic woods and can be extremely high priced. Cypress makes for excellent siding and exterior trim.

      Pressure-treated and Composite Boards

        Pressure-treated lumber is typically a yellow pine that has been pressure-treated with a preservative. This type of lumber is impregnated with toxins. Generally, this wood should only be used in ground contact and for framing members of an outdoor structure. It should not be used where the lumber can be in permanent contact with animals or humans.

        Plastic composites have come into the outdoor wood marketplace. These are constructed from recycled materials and treated with sunlight inhibitors to reduce fading. Special fasteners typically must be used to secure this type of material to the framing, as normal nails or screws can damage the internal recycled materials. Most plastic composites come with a limited warranty from the manufacturer, and certain installation practices may have to be followed. Cost for pressure-treated lumber and plastic composites varies greatly, depending on the amount of shipping involved.

      Dry Climates and Temporary Structures

        The woods and composite materials mentioned above are all suitable for wet and dry environments. Oak hardwoods such as white oak, red oak and post oak can be used for decking and railing material in dry climates. The low humidity allows the wood to withstand softening due to rot. The tight grain of the wood can keep insects from penetrating the surface and causing damage. Termite infestation may become a problem if this wood is left in contact with the ground.

        Inexpensive pine boards such as white pine and yellow pine can be used for temporary structures. Typically, untreated pine boards can withstand outdoor environments for two to three years. The soft wood can be used for chairs and tables if they are painted and brought under cover during cold and inclement weather.

      Tuesday, October 29, 2013

      How to Donate Old Furniture

      How to Donate Old Furniture

      Sure, you might be sick of looking at that same old avocado-green couch, but it could actually be a blessing to someone who needs it. In addition, by donating your old furniture, you'll be able to get a tax break for your contribution. It's a clear win-win; why not clear out some space and invite some good karma? Does this Spark an idea?

      Instructions

        1

        Check your yellow pages under "Associations," "Health Service" or "Social and Human Services for Individuals and Families" to find local charitable organizations that may accept furniture donations. Also check under "Thrift Shops," as these places almost always accept such donations.

        2

        Contact Goodwill (800-664-6577) or the Salvation Army (800-SAL-ARMY).

        3

        Call your local high school's drama department or a community theater to see if they can use your furniture for sets.

        4

        Arrange for the pickup of the furniture. Most charities will send someone to pick up your furniture if you donate it, but be sure to ask about this, especially if delivering the furniture yourself isn't an option.

        5

        Get a receipt when the items are picked up by the charity. Once you get the receipt, itemize the items you gave to charity and list them with their fair market value. Attach this list to the receipt. See the Related eHow, "Figure Fair Market Value for Donations of Property to Charities."

        6

        Save your receipt and list for tax purposes.

      The Best Outdoor Umbrellas

      The Best Outdoor Umbrellas

      When searching for the best outdoor umbrella, whether for a patio, a garden, or the beach, there are a number of things to take into consideration. Is it stable? Is it fashionable? Will it last? Will it withstand the raging winds? These are four questions that must be asked to determine what kind of outdoor umbrella to purchase. Does this Spark an idea?

      Difference in Construction

        Typically, there are two kinds of outdoor umbrellas -- the patio or garden umbrella and the beach umbrella. Patio or garden umbrellas are designed for stability with a centered or cantilever offset base and frame. The base of a patio umbrella is often bolted down on the surface, be it concrete, wood, or compact soil. This allows the umbrella to stand tall amidst heavy winds.

        Beach umbrellas are similar to traditional personal umbrellas with regards to construction, wherein the canopy can open wide and close easily when the upper part of the frame or the runner is eased up and down respectively. They are fashioned without a base platform, as they are normally wedged and embedded down onto the sand for stability.

      The Canopy

        When choosing an outdoor umbrella, the first thing that must be scrutinized is the canopy. A good umbrella should have a canopy that is breathable and wind resistant. Canvas umbrellas sport a weave that allows air to pass through while providing wear and tear resistance. Canvas lasts long and is laced with waterproof additives to preserve color and design. For beach umbrellas, where shade is more important than breathability, a polyester canopy finish with polyurethane is the best choice since it provides maximum sun protection.

      The Frame

        The material used for the frame of an outdoor umbrella consists of a single or two-piece pole and the ribs on top for the canvas to lie on. Typically, outdoor umbrellas are made of aluminum, stainless steel, wood, or fiberglass. While a lot of people would prefer wooden frames due to its rustic appearance, they are often prone to wind damage and must stand straight up. Aluminum and stainless steel frames are flexible since these can be tilted at virtually any angle and offer good resistance against wind. Rust is the only real issue with any metal-based frame. Fiberglass frames are great for beach umbrellas, as they are built to withstand heavy winds.

      The Base

        Typically, the wider the base of the umbrella, the more stable it will be. However, do pay attention to the position of the bolts and the material of the base. It should be made of metal and there should be bolts at all sides, be it round or square in shape. Since beach umbrellas are not fitted with a base; select one with a screw-type end for easy wedging into the sand.

      Jack Post CG-21Z Country Garden Glider Chair with Tray, Bronze


      Features
      • Elegant high-back glider chair perfect for outdoor relaxing
      • Made from natural wood with powder-coated oval tube frame
      • Easy bolt-together assembly
      • Beautiful bronze finish
      • Measures 29-1/2 by 35-1/2 by 37-inch

      Special Offer: check this out!

      Related Products

        Product Description
        Comfort. Relaxation. And true outdoor style. The Jack Post Country Garden Hi-Back Glider Chair with Tray is a great way to sit back and enjoy the sun, a good book, and a tasty cold drink. The sturdy chair is made using 21-1/2-inch natural hardwood slats and a 5-inch shaped top board on a powder-coated oval tube frame designed to endure weather. The slats and frame form a comfortable rounded seat you can sit comfortably in for hours. A convenient wooden tray holds drinks and snacks and can be assembled on either the left or right side of the chair. Assembly is easy with very little hardware involved. Square seat supports and seat brace offer additional strength. Measures 29-1/2 by 35-1/2 by 37-inch.


        Monday, October 28, 2013

        Noodlehead N111C Flexible Lawn & Garden Sprinkler


        Features
        • You control the spraying of only that which you want watered
        • Conserves your water by not spraying streets, sidewalks, buildings, windows, people or cars
        • No more brown spots in your lawns, simply point more noodles at them
        • Adapts to any shape or pattern you can imagine
        • Perfect for flowerbeds, sideyards, lawns, patios, courtyards, vegetable and herb gardens

        Special Offer: check this out!

        Related Products

          Product Description
          N111C Features: -New venture technologies llc the flexible lawn and garden sprinkler.-Attach to a standard garden hose.-Also screws onto a riser.-It's quick, easy and fun to use.-Create your own perfect pattern.-Adapt to any shape or garden.-You control the coverage.-Save money and conserve water.-As your garden grows, simply rebend noodles to customize new watering patterns.


          How to Repair Outdoor Wicker Furniture

          How to Repair Outdoor Wicker Furniture

          Outdoor wicker furniture is commonly used on patios, decks and gardens because it resists natural elements while providing comfort. Sections of wicker are made from natural or synthetic material woven into a variety of patterns and designs. However, the fragile material cracks easily when dry. Repair any damages such as broken, cracked or missing strands or sections to continue using the furniture instead of rendering it useless. Make sure any additional wicker you need for repair matches the wicker used in your furniture so it blends easily instead of standing out. Does this Spark an idea?

          Instructions

          Broken Strand Repair

            1

            Flip the wicker chair upside down. Inspect the strand to determine whether it is broken or cracked. Apply strong glue to a broken strand that has both ends intact. Allow the glue to thoroughly dry. If the strand is broken, clip it off at an angle and slide it out of the frame or weave using tweezers. Use sharp scissors that slice straight through the strand instead of leaving a jagged cut. Insert exposed ends under interwoven strands and apply glue to prevent these from unraveling.

            2

            Soak a new strand in a container of water for 15 to 20 minutes. Measure the length of the removed strand and cut the new strand to the same length plus 2 inches.

            3

            Insert the tip of the new strand through the underside of the chair and weave it in the gap following the pattern of surrounding strands. Pull the strand taut while weaving.

            4

            Trim ends of the new strand and butt the ends so they are in line with the wicker on surrounding wicker strands. Follow manufacturer's directions to apply waterproof glue over the new strand and allow it to dry before placing the chair back in its place.

          Cracked Strand Repair

            5

            Immerse the tip of a paintbrush in a bottle or container of boiled linseed oil and spread it evenly over the cracked surface of the wicker furniture. Make sure you cover all gaps between woven sections.

            6

            Immerse the tip of the brush in the oil and reapply over the surface of the wicker chair again. Repeat the procedure until it stays shiny and cannot absorb any more oil.

            7

            Rub the chair with paper towels to wipe excess oil off. Leave the chair to dry for 24 hours.

          Missing Strand Replacement

            8

            Soak the new strands of reed in water for 15 to 20 minutes. Always soak more than you need to make up for those that crack or are damaged during the weaving process.

            9

            Spread a wet cloth over the part of the wicker chair that has missing strands for 30 minutes. This makes the surrounding strands pliable so you easily weave the new ones around them.

            10

            Insert the tip of a new strand into the gap and weave it in and out of the other strands. Glue the ends of the new strand to the edge of the furniture or two strands on either side if necessary. Leave the chair to dry.

          Sunday, October 27, 2013

          How to Use Wood Chips in a Garden

          Wood chips are used as both a decorative touch and a mulching compound in many outdoor gardens. These wood chips, which are often made from pine bark and cedar, can be placed around shrubs, flowers and trees in order to reduce weeds and protect fragile root systems. Does this Spark an idea?

          Instructions

            1

            Investigate the different types of wood chips you can use in your garden. Some wood chips vary in size, such as nuggets, mini-nuggets and finer levels of wood mulch. Others use more exotic materials, such as cocoa and cedar, to provide a different appearance and aroma, and they may actually prevent insects from infesting your garden.

            2

            Use wood chips in a garden by first preparing the soil underneath with a cultivator or steel rake. Remove all weeds from the dirt, as well as any large rocks or branches that may restrict plant growth. Smooth and even out the soil with either your hand or the steel rake, so that the wood chips can be applied evenly over the top.

            3

            Place the wood chips evenly over the soil until the ground is completely covered. While too many wood chips can limit the amount of oxygen that reaches the roots of your plants, you still want to compensate for the amount of wood chips that will shift due to wind and rain. A layer of wood chips around 3 to 4 inches deep should suffice.

            4

            Keep the appearance of your wood chips fresh by churning them up every spring and adding an additional layer of fresh chips. Both sunlight and harsh winters can cause the wood chips to fade and discolor over time. But svoid completely replacing the wood chips every year, as doing so can be wasteful.

            5

            Reduce the amount of wood chips you use in your garden if you begin to notice cankers developing around the trunks of small trees and shrubbery. This may indicate that the wood chips are interfering with the amount of oxygen that is reaching the roots of the plant. Simply peel off the top layer, and apply a fertilizer that is heavier in nitrogen.

            6

            Use landscape fabric underneath your wood chips for additional protection against weeds. Simply roll out the fabric on top of the prepared soil, puncture the plastic to accommodate planting and cover the plastic with wood chips.

          Griffith Creek Designs Coil Hose, 75-Feet


          Features
          • 75 Feet Long
          • Forest Green
          • Hose Size: US Standard 3/8"
          • Ends are Solid Brass for Long Life
          • Tangle Free Design

          Special Offer: check this out!

          Related Products

            Product Description
            Sturdy, construction makes the Griffith Creek Designs coil hose stand apart from the rest. Made from 100% polyurethane, the hose recoils automatically for easy handling and storage. It's great for small city landscaping and marinas. Features 12 inch tails on each coil end making it very user-friendly product.


            Camco 22823 Premium 5/8"ID x 10' Drinking Water Hose


            Features
            • 20 percent thicker than standard drinking water hoses
            • 10' L x 5/8" ID
            • Machined fittings and strain-relief ends for added durability
            • Drinking water safe
            • CSA low lead content certified and complies with California's AB1953 and Vermont Act 193 Low Lead Laws

            Special Offer: check this out!

            Related Products

              Product Description
              Camco's 10' premium drinking water hose is a heavy-duty reinforced 5/8" ID hose that is 20 percent thicker than standard hoses. The anti-kink design features machined fittings and strain-relief ends for added durability. The hose is made of drinking water safe material. CSA low lead content certified. Complies with Californias AB1953 and Vermont Act 193 Low Lead Laws.


              Saturday, October 26, 2013

              Cleaning White Plastic Patio Furniture

              Brushing Off Dirt

                White patio furniture looks great when you first buy it. It is durable and can withstand harsh weather conditions. However, if it is left outside, it can become dirty and dingy. The first step in cleaning your white patio furniture is to brush off all the dirt you can. Use a hand brush or a broom with bristles of any stiffness (although softer bristles may allow you to get into more crevices). Start at the top and work downward, carefully removing the dirt, cobwebs and bugs.

              Washing

                The next step in cleaning your white patio furniture is to wash it down. Create a solution of 1 cup of vinegar in 1 gallon of water with a tablespoon or two of dish washing liquid. Dip a sponge or rag (microfiber towels work well) into the solution and liberally wet the furniture. Scrub the furniture down well, concentrating on areas that are particularly dirty. You can add a little bleach to the water if you want to whiten the furniture, but be aware that bleach can make plastic brittle and even yellow it over time so use it with caution. Rinse your furniture well and allow it to air dry or dry it with a towel.

              Last Resort

                If your patio furniture is still dirty, you can use a Mr. Clean Magic Eraser to finish the job. Wet the eraser sponge and scrub the spots on the furniture that are still dingy or dirty. Make sure to wear gloves if you will be using the erasing sponge for a long period of time. Although these sponges are relatively mild, they can become irritating after your skin is in contact with them for extended times. After your furniture is clean, make sure to rinse it well and either allow it to air dry or dry it with a towel.

              Home Remedies for Vegetable Garden Green Worms

              Garden green worms, also known as cabbage worms, are easily recognized by their bright green color. Green worms will feast on cabbage, broccoli, cauliflower, mustard greens, kale and radish leaves. Home remedies can be used to get rid of garden green worms and are safe to use in organic vegetable gardens. Does this Spark an idea?

              Picking and Prevention

                Pick and kill adult green worms found on your vegetables, as well as larvae, which will be on the underside of the plant leaves.

                Place gardening floating row covers on plants such as spinach, broccoli, cabbage and cauliflower. The material is light and will float on top of the vegetable crops, allowing room for growth but preventing green worms from penetrating to the leaves. To protect cabbage, place a nylon stocking on each head until harvest time.

                Plant red cabbage cultivars in your garden, because they are less appealing to green worms. Planting mint, sage, rosemary, thyme or hyssop among your vegetables will help deter the insects.

              Homemade Insecticide

                A homemade insecticide can be mixed together as a green worm remedy. Soak 3 ounces of minced garlic in 2 tablespoons of mineral oil in a glass jar with a lid for 24 hours. Strain out the garlic and add 1 pint of water and 1 teaspoon of liquid dish soap. The soap will act as a sticking agent. Dilute 1 to 2 tablespoons of the garlic-soap mixture with 1 pint of water in a spray bottle. Shake well and spray on the plant leaves, covering both top and bottom.

                Test this spray on one or two plants for 24 hours to make sure the plants do not have an adverse reaction. Always spray homemade insecticide in the morning, as full sun exposure can burn your plants.

              Neem Oil

                A neem oil mixture can be used as a natural insecticide, and is safe to use in organic gardening. Neem oil concentrate can be purchased at local lawn and garden centers or stores specializing in organic gardening products.

                Mix 1 ounce of neem oil in 1 gallon of water, and add a drop of liquid dish detergent as a wetting agent. Besides spraying vegetables that green worms infest, it can be used on spices and herbs, small fruits and berries, stone fruits and tropical fruits. This mixture is safe to re-apply once a week if necessary.

              How to Grow Moss Rose (Portulaca grandiflora)

              How to Grow Moss Rose (Portulaca grandiflora)

              Choose moss rose if you need a plant that flowers where it's hot and dry. This annual's flowers - bright reds, oranges, yellows, purples and pinks - glow atop green, succulent leaves. Moss rose grows 4- to 8-inches tall and spreads up to 2 feet, making it a great groundcover. Does this Spark an idea?

              Instructions

                1

                Buy newer types of moss rose, which stay open longer during the day, if possible. Old types open at noon and close at dusk and on stay closed on overcast days.

                2

                Choose a spot that gets full sun. Moss rose thrives in hot, dry conditions that make other flowers wilt. Ideal spots include rock gardens, between pavers, along baked driveways or sidewalks, and in containers on patios and walks.

                3

                Plant seedlings 12- to 24-inches apart, according to directions, after your region's last frost date.

                4

                Water sparingly, if at all. Allow soil to dry out between waterings.

                5

                Pinch off spent blooms to encourage flowering and to keep the plant tidy.

                6

                Fertilize once or twice in mid- and/or late summer.

                7

                Discard the plant after frost in the fall.

              Friday, October 25, 2013

              Layout of Vegetable Garden Plan

              Layout of Vegetable Garden Plan

              A well-planned vegetable garden can increase yields and reduce the amount of work required in maintaining it. A few general caveats should help your vegetable garden remain healthy and productive. Does this Spark an idea?

              Garden Location

                The first part of designing the layout of your garden is to select a good general location. An ideal vegetable garden location will have full sun most of the day. If that isn't possible, select a location that gets the most sun possible. The garden will also have to have water for irrigation and be protected from animals that could trample the sprouting plants or eat the vegetables before their harvest. If no natural protection is available, simple wire fencing will work well.

              Garden Type

                The next thing to decide when planning your garden is the type of garden you want. If you opt for an intensive gardening method, where seeds are over-planted and the weaker seeds culled as the plants sprout, either a ground-based garden or raised bed will work. For this type of garden, the garden area is divided into 2- to 4-foot squares. Make sure to leave enough space to get into the patches for weeding and harvesting. Each square is over-planted with seeds. Plant more seeds than the square can support, and either eat the young plants, as in the case of carrots, or cull the weaker plants, as in the case of tomatoes or peppers. If you are planning on doing very little culling, intensive gardening can produce very good yields with proper fertilization.

                The other garden type to consider is a traditional rowed garden, where vegetables are planted in rows. Leave enough space between the rows to allow easy access for weeding and harvesting.

              Plant Heights

                Whatever type of garden you plant, make sure to plant the vegetables so that lower growing plants have enough sunlight. For example, if you plant corn, place the corn so it doesn't shade the carrots or jalapenos as the corn grows. If your plot gets more sun in the morning, plant tall crops like corn in the west. This will allow the lower growing plants adequate sunshine. Conversely, if your plot gets better afternoon sun, plant the tall plants in the east.

              Thursday, October 24, 2013

              DIY Outdoor Furniture

              DIY Outdoor Furniture

              No matter your budget, you can create a usable outdoor living and lounging area. Creatively re-imagine construction site materials and inexpensive items into a full set of patio and garden furniture. Using re-purposed materials doesn't only save you money, but is also eco-friendly, making your garden and patio "green" in more ways than one. Items such as shipping pallets and cable spools are normally headed for the dump, but find new life under a coat of bright paint in your newly furnished backyard. Does this Spark an idea?

              Instructions

              Low Coffee Table

                1

                Sand and paint the door and paint the pots to match each other and allow the paint to dry before you proceed; this step is optional.

                2

                Measure the door for height and width. Draw a chalk rectangle matching these dimensions on your patio over the area where you want to place the table.

                3

                Place the four ceramic pots open side down inside the chalk box, setting one just inside each corner. Wash away the chalk with a hose or a bucket of water.

                4

                Place the door over the pots, using the pots as legs, to complete the table.

              Easy Pallet Sectional

                5

                Sand your pallets thoroughly, removing any splintered or rough edges. Paint your pallets, if you want to change their color, matching them to the other furniture, if you want your outdoor furniture to match.

                6

                Arrange two of your pallets into an "L" formation. Cover the top of the pallets with a liberal amount of wood glue. Place the remaining two pallets directly on top of the other pallets, matching all edges, to add height to the sectional.

                7

                Add patio bench cushions and decorative exterior pillows to the top of the pallet sectional to add comfort to your outdoor seating. Add a door lengthwise behind one of the pallets to act as a decorative back, if you've placed the pallet against a wall or other tall, firm structure.

              Cable Spool Ottoman

                8

                Sand and paint the cable spool, matching it to the other furniture if matching is desired.

                9

                Measure the diameter of one of the spool's circular ends. Cut out a piece of foam which matches the end of the spool's diameter, using the serrated knife. Wrap the foam in a garbage bag so it will be impervious to moisture.

                10

                Add a few inches to the diameter measurement you just used, and then cut out a circle from the exterior fabric using that diameter. Set the circular piece of fabric good side down on the ground, and then set the foam piece in its center; finally, set a circular end of the cable spool directly on top of that.

                11

                Pull the edge of the fabric over to the underside of the spool's lip and staple it down. Pull an edge of fabric from the opposite side and staple that down. Staple around the entire circumference of the underside of the spool's lip, always stapling on the opposite side of your last staple.

                12

                Turn the spool over to reveal its upholstered seat.

              Tuesday, October 22, 2013

              Greenland Gardener 8-Inch Raised Bed Double Garden Kit


              Features
              • Made from recycled plastic and wood
              • Will not rot
              • Patented corner system

              Special Offer: check this out!

              Related Products

                Product Description
                Raised garden bed with dimensions of 42-Inch by 84-Inch by 8-Inch high. Product has a patented corner system. Made from recycled plastic and wood. Product does not require any tools to assemble, assembles in minutes.


                Outdoor Interiors Eucalyptus 3 Piece Square Bistro Outdoor Furniture Set - includes cushions


                Features
                • Fully assembled
                • Includes cushions
                • 23.5x23.5x28.5 Table
                • Made from dense and durable Eucalyptus
                • 3 Piece Set

                Special Offer: check this out!

                Related Products

                  Product Description
                  Enjoy relaxing on your Eucalyptus set immedaitely when this fully assembled 3 piece set arrives. This stylish and affordable set offers a long lasting enjoyment. Included is one square table (23.5x23.5), two chairs and two cushions. Sturdy and sleek makes this combo a perfect addition to any patio or yard.


                  How to Design a Children's Garden

                  It's said that gardens grow children, and this is particularly true when
                  a child's first experiences with gardening are fun and successful.
                  Nurturing plants and the sharing the bounty are great confidence
                  builders for budding green thumbs. Indulge your child's curiosity in
                  bugs, worms and sprouting seeds, and offer plants that mature quickly
                  with surprising results. You can also help stimulate interest and a takecharge
                  attitude by including your child in each step of garden planning. Does this Spark an idea?

                  Instructions

                    1

                    Give your child his or her own small plot or a well-defined section of the larger family garden to encourages a sense of ownership without being overwhelming. A square-yard (or square-meter) garden is a good size for a young child.

                    2

                    Talk to your child about where to put the garden. It's an opportunity to share ideas about what plants need to thrive: plenty of sunshine, water and healthy soil. Together, choose a site that is accessible to your child (and the hose).

                    3

                    Create a child's garden in just about any shape as long as it includes paths or stepping-stones for easy access to plants. A plot composed of square-foot (or square-meter) planting pockets divided by paths is practical; but a garden shaped like a wagon wheel, with "spokes" dividing the planting beds, works well, too.

                    4

                    Plant vegetables that your child loves to eat (or could learn to) and are easy to grow from seed sown directly in the garden. Large seeds, such as beans, cucumbers, pumpkins and zucchini are easiest to plant and sprout quickly. Radishes are the quickest to grow, though seeds are small.

                    5

                    Grow dramatic flowers such as sunflowers and zinnias, which have large, fast-growing seeds and produce bold, colorful blossoms. The "mammoth" variety grows to 9 to 12 feet (2.7 to 3.7 m) tall and produces magnificent flower heads loaded with edible seeds. Both require warm soil and full sun.

                    6

                    Appeal to all the senses. Include herbs, such as basil and parsley, for garden grazing. Add fragrant plants, such as lemon verbena, rose-scented geraniums and pineapple salvia. Some plants are just for touching, like perennial lamb's ears with its soft, fuzzy leaves and silvery green color.

                    7

                    Go to the nursery together to get ideas and choose plants. Include some seedlings, which provide instant gratification and great opportunities to dig holes when transplanting. Sweet cherry tomatoes are a popular choice because they produce loads of bite-size treats that children can pick and eat straight from the garden. In the flower department, snapdragons are favorites because of the flexible dragon's jaw that invites pinching. Let your child choose something new to you, too.

                    8

                    Initiate children's projects to keep things interesting while plants grow. Encourage your child to make a sign for the garden such as "Jeff's Place" or "Patricia's Plot." Construct a scarecrow, paint stepping-stones or build a twig teepee. These and other creative endeavors broaden your child's interest in the garden.

                    9

                    Remember that half of the fun is to pick, wash and cook up the bounty. Let your child share the joy of the harvest.

                  Ideas for a Small Rock Garden

                  Ideas for a Small Rock Garden

                  If you've ever seen a miniature "Zen garden," you know that rock gardens can come in any size. You can design a perfectly pleasing rock garden for yourself in many small spaces, from an apartment patio to a narrow side yard to a rooftop retreat. Apply the same design principles as you would for a full-size garden, using contrasting colors and textures and harmonizing individual elements to create a unified look. Does this Spark an idea?

                  Play With Scale

                    When planning a small rock garden, you can use many tricks to either highlight or downplay the space's unusually diminutive scale. If you'd like to create the appearance of a larger space, you might use slightly smaller pebbles than you would normally select. Especially across an expanse of rocks, where the eye has no other reference points, a greater number of smaller pebbles will make the garden appear larger. Alternately, if you design a rock garden with stones of varied sizes, ranging from boulders to tiny pebbles, you can more easily draw the eye along vertical lines. If you'd like a small space to showcase a lot of different plants, first build up the earth into a slope, and then use large and small stones as a series of "steps." You'll pack more plantings into your mountainous rock garden than you would on a flat bed.

                  Low-Maintenance Gardening

                    If you're starting with a small space, you're already halfway to having the ideally low-maintenance rock garden. To make your plantings even easier to care for, consult with your local horticultural extension service and local nurseries about native plants. By planting native flora among your stones, you'll have fewer problems with insects or diseases, you'll need to water less and your plants will tolerate the climactic highs and lows of your area. In addition to your area's native varieties, some low-maintenance standbys do well in a broad range of climates, including Irish moss, Hens and chicks and California fuschia are all resilient and drought-resistant options.

                  Add Some Color

                    Your rock garden's small size needn't limit your imagination when it comes to color. Take inspiration from the planting style of cottage gardens where many flowering plants provide a broad spectrum of colors at multiple levels. In your rock garden, plant such flowering species as Carpet bugle with blue and purple flowers; Mountain alyssum, with yellow blooms; Kinnikinick, with red fruits and white flowers, tinged with red; and the Sea Pink, a grass-like plant with flowers ranging in color from white to pink to purple.

                  Fiskars 9124 Professional Bypass Pruning Shears


                  Features
                  • An ideal professional grade tool for all kinds of pruning tasks
                  • Adjustable blade tension
                  • Ambidextrous handle design allows for comfortable left or right-handed use
                  • Integrated sap groove keeps cutting action smooth and stick-free
                  • 1-inch cutting capacity

                  Special Offer: check this out!

                  Related Products

                    Amazon.com
                    The Fiskars professional bypass pruning shears are an ideal choice for all kinds of pruning tasks. The pruner features adjustable blade tension that gives the user increased control over desired cutting force and precision. The replaceable stainless steel blade can cut branches up to 1 inch in diameter and features an integrated sap groove to keep the cutting action smooth and stick-free all-season long. The bypass blade provides a cleaner cut for living, green growth, and the ambidextrous handle design allows for comfortable left or right-handed use, making it an ideal choice for personal or professional use.


                    Monday, October 21, 2013

                    The Layered Garden: Design Lessons for Year-Round Beauty from Brandywine Cottage


                    Special Offer: check this out!

                    Related Products

                      Product Description

                      Brandywine Cottage is David Culp's beloved two-acre Pennsylvania garden where he mastered the design technique of layering interplanting many different species in the same area so that as one plant passes its peak, another takes over. The result is a nonstop parade of color that begins with a tapestry of heirloom daffodils and hellebores in spring and ends with a jewel-like blend of Asian wildflowers at the onset of winter.

                      The Layered Garden shows you how to recreate Culp's majestic display. It starts with a basic lesson in layering how to choose the correct plants by understanding how they grow and change throughout the seasons, how to design a layered garden, and how to maintain it. To illustrate how layering works, Culp takes you on a personal tour through each part of his celebrated garden: the woodland garden, the perennial border, the kitchen garden, the shrubbery, and the walled garden. The book culminates with a chapter dedicated to signature plants for all four seasons.

                      As practical as it is inspiring, The Layered Garden will provide you with expert information gleaned from decades of hard work and close observation. If you thought that a four-season garden was beyond your reach, this book will show you how to achieve that elusive, tantalizing goal.


                      Hearth & Garden SF40244 Deluxe Rectangle Table and Chair Set Cover


                      Features
                      • Heavy weight 380gm pvc coated polyester
                      • Resist cracking, fading, tearing and mold build-up
                      • Pvc coating increases water resistance and further protection from the elements
                      • Neutral but Fashionable Taupe Color Matches Your Outdoor Furniture and Environment
                      • Vented for better airflow to avoid moisture buildup on your furniture

                      Special Offer: check this out!

                      Related Products

                        Product Description
                        Protect your outdoor items from winter's wrath with our Hearth and Garden line of Patio furniture covers. Made from 380gm polyester, our furniture and grill covers resist cracking, fading, tearing, and mold build up. Coated with PVC for increased water resistant and further protection from the elements, you can be confident that your patio furniture is secure through the seasons. We have covers available to fit all of your needs, from tables and chairs to grills and patio heathers. All of these items are available packaged in clear vinyl poly bags.


                        The Garden Club of America: One Hundred Years of a Growing Legacy


                        Special Offer: check this out!

                        Related Products

                          Product Description

                          How women changed the American landscape from planting war victory gardens to saving the redwoods, beautifying the highway to creating horticultural standards.

                          In 1904, Elizabeth Price Martin founded the Garden Club of Philadelphia. In 1913, twelve garden clubs in the eastern and central United States signed an agreement to form the Garden Guild. The Garden Guild would later become the Garden Club of America (GCA), now celebrating its 100th anniversary in 2013. GCA is a volunteer nonprofit organization comprised of 200 member clubs and approximately 18,000 members throughout the country.

                          Comprised of all women, GCA has emerged as a national leader in the fields of horticulture, conservation, and civic improvement. As an example, in 1930, GCA was a key force in preserving the redwood forests of California, helping to create national awareness for the need to preserve these forests, along with contributing funds to purchase land on which they stood. The Garden Club of America Grove and the virgin forest tract of Canoe Creek contain some of the finest specimens of the redwood forests.

                          The Garden Club of America is a centennial celebration of strong women who nurtured the country, helped spread the good word of gardening, and continue to plant seeds of awareness.


                          How to Start a Permaculture Vegetable Garden

                          How to Start a Permaculture Vegetable Garden

                          Permaculture is a sustainable method of producing food that utilizes the natural relationships of plants, animals, insects, pests and predators to create an ecosystem that is self-sustaining year after year and requires no pesticides or chemicals. It takes very little to get started with permaculture gardening. The best way is to get started with something simple, in this case a small area where you will plant some vegetables. You can add and expand to this small start as you learn more and begin to grow more. Does this Spark an idea?

                          Instructions

                            1

                            Find an area of your lawn that gets plenty of sun and good drainage.

                            2

                            Turn over the dirt with a garden fork. Add some manure, organic fertilizer, or compost to the dirt as you turn it.

                            3

                            Pull out the big clumps of grass from the turned over area and throw them in your compost bin if you have one.

                            4

                            Buy some earthworms and introduce them to the soil if you haven't discovered an ample supply already in the area.

                            5

                            Go to your local garden store and find out which vegetables grow best in your area. Choose a few vegetables to start with and buy either the seeds or small seedlings. The seedlings will be less susceptible to snail problems, while transplanting can be hard on plants as well, so you may want to try some of both for this first experiment.

                            6

                            Plant your seeds or seedlings and give them plenty of water.

                            7

                            Learn more. While this is all you need to do to make a small vegetable garden, going forward you will want to expand according to the sustainable principles of permaculture including use of animals, insects, compost, water features and habitat. The Permaculture Institute offers a wealth of imformation, courses and workshops.

                          Sunday, October 20, 2013

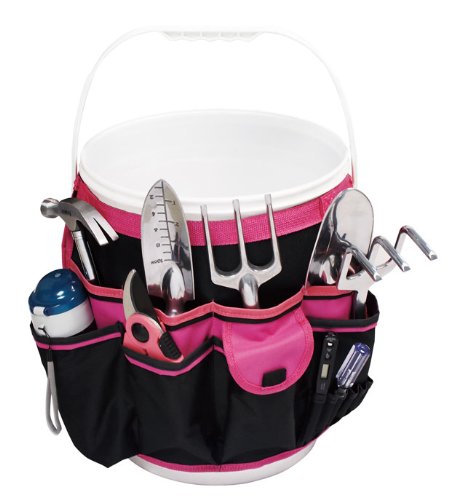
                          Apollo Precision Tools DT0825P 5-Gallon Bucket Garden Tool Organizer, Black/Pink


                          Features
                          • Dollar 0.25 from this purchase is being donated to The Breast Cancer Research Foundation
                          • 14 inside pockets, 34 triple row outside pockets
                          • Fits any standard 5 gallon bucket (bucket not included)
                          • Adjustable hook & loop strap attaches quickly and easily
                          • Holds most hand and garden tools

                          Special Offer: check this out!

                          Related Products

                            Product Description
                            Get organized with the Apollo Tools Bucket Tool Organizer. This Bucket Tool Organizer is made of single layer 600D oxford cloth w/PVC inner layer and will convert your 5 gallon bucket into a tool organizer. It is perfect for keeping your tools organized, protected and easily accessible. With the hook and loop fastener strap it fits any 5 gallon bucket and makes carry tools a breeze. Utilizes 14 inside pockets and 34 triple row outside pockets to hold anything and everything from your garden tools, gloves, seeds, marking sticks, string, scissors, tape , water bottle, and/or cell phone. Made of an extremely durable cloth constructed of PVC coated polyester material that is extremely tear resistant. This material is typically found on products that require abrasion resistance and waterproof characteristics like backpacks, hunting equipment or luggage. Color is Black with green accent. Bucket not included.


                            Hearth & Garden SF40224 Adirondack Chair Cover


                            Features
                            • Heavy weight 380gm pvc coated polyester
                            • Resist cracking, fading, tearing and mold build-up
                            • Pvc coating increases water resistance and further protection from the elements
                            • Neutral but Fashionable Taupe Color Matches Your Outdoor Furniture and Environment
                            • Vented for better airflow to avoid moisture buildup on your furniture

                            Special Offer: check this out!

                            Related Products

                              Product Description
                              Protect your outdoor items from winter's wrath with our Hearth and Garden line of Patio furniture covers. Made from 380gm polyester, our furniture and grill covers resist cracking, fading, tearing, and mold build up. Coated with PVC for increased water resistant and further protection from the elements, you can be confident that your patio furniture is secure through the seasons. We have covers available to fit all of your needs, from tables and chairs to grills and patio heathers. All of these items are available packaged in clear vinyl poly bags.


                              2x4basics 90110 Flip Top BenchTable, Sand


                              Features
                              • The flip top benchtable easily converts from bench to table and back in seconds
                              • Made of durable, structural resin, the all-weather frame is built to last
                              • Simple assembly is required with only a powered screwdriver, wrench and saw
                              • Hardware is included (tools and 2x4s not included)
                              • Lifetime warranty

                              Special Offer: check this out!

                              Related Products

                                Product Description
                                Just add 2x4s to make the 2x4 Basics Flip Top BenchTable. Make a comfortable and sturdy bench and table any size up to 8 feet long. Our patented slide lock secures your Flip Top BenchTable in seconds without tools. Convert from bench to table and back with easy. When you are finished, the table is easily converted back to a bench for space saving storage. Make two for a full size picnic table!Simple assembly is required with only a powered screwdriver, wrench, and saw. Only straight, 90 cuts are required - no miters or angles. Stain, paint, or finish the wood to fit your style and application or use treated lumber. All hardware is included (tools and 2x4s not included.)The assembled unit stands 34 inches high (86cm) in the bench position and 31 inches (78cm) in the table position, both with a 17.5 inch (44cm) seat height.Made of durable, structural resin, the all-weather frame is built to last and covered by our Lifetime Warranty.


                                Saturday, October 19, 2013

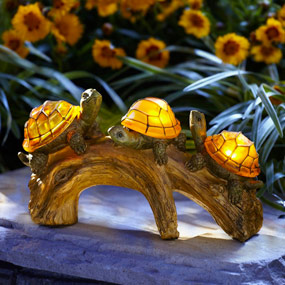
                                Moonrays 91515 Turtles on a Log Solar-Powered Outdoor LED Light


                                Features
                                • Great for any turtle lover
                                • Solar fixture charges by day in the sunlight
                                • Amber LED lights automatically glow at night
                                • Made of durable Polyresin
                                • Rechargeable AA NiCd battery (Included)

                                Special Offer: check this out!

                                Related Products

                                  Amazon.com

                                  Moonrays turtles on a log
                                  This solar-powered outdoor light fixture features three turtles with shells that light up at night to whimsically illuminate your lawn, garden, deck, or patio (view larger).

                                  The Moonrays 91515 turtles on a log solar-powered outdoor LED light is a charming garden accent full of whimsy and wildlife to greet you when you come home. Absorbing sunlight during the day and automatically turning on at twilight, the three amber-colored turtle shells emit a warm glow to provide just the right level of gentle ambient lighting for your enjoyment during barbecues, picnics, lawn parties, and more in your yard.

                                  Harness Sunshine to Light the Night

                                  The turtles on a log garden solar-powered garden light features durable polyresin construction that withstand the elements like wind, rain, snow, and ice without rusting or chipping like metal or ceramic fixtures. And with meticulously hand-painted details that infuse life-like charisma into these three little reptiles. Their gentle eyes and quiet smiles emanate a serenity that will bring a sense of cuteness and calmness every time you lay eyes on them, whether theyre nestled among foliage or perched on a deck railing. After a day of soaking in solar rays for energy, LED bulbs illuminate the turtles shells as soon as its dusk to give off a warm radiance for ambient lighting in your lawn or garden or on your patio, deck, or walkway. The lights then turn off automatically at dawn. The fixture is powered by one rechargeable 300 mAh AA NiCd rechargeable battery, which is included with purchase.

                                  About Moonrays

                                  Moonrays landscape lighting has been augmenting the beauty of homes and surroundings while improving security and safety since 1986. They offer fixtures in plastic and metal in a plethora of water-resistant colors and finishes, and their designs reflect a variety of personal styles, from contemporary to traditional. Moonrays is an industry leader in helping customers personalize their outdoor spaces with creative and sophisticated designs to fit every taste.

                                  What's in the Box

                                  One Moonrays 91515 turtles on a log solar-powered outdoor LED light and one 300 mAh AA NiCd rechargeable battery.


                                  Moonrays logo
                                  Highlights Charming turtle solar garden accent Three turtle shells emit warm glow at night Polyresin construction with hand-painted finish Runs up to eight hours on a full charge Rechargeable AA NiCd battery included


                                  Friday, October 18, 2013

                                  Flowers in the World's Most Beautiful Gardens


                                  Special Offer: check this out!

                                  Related Products

                                    Product Description

                                    Flowers in the Worlds Most Beautiful Gardens puts the spotlight on the star of the gardenthe flower. Tracing the history of flower gardens from the Middle Ages to today, the book discusses the types of flowers commonly planted, the landscape designs, the advances in technology, and how these practices have changed throughout the centuries. Each chapter also focuses on a significant type of bloomthe rose, iris, and tulip, among others.

                                    Illustrated with more than 180 exquisite photographs by Alain Le Toquin, this book features the worlds most extraordinary flower gardens, showcasing gardens in countries such as the United Kingdom, France, Germany, Italy, Belgium, New Zealand, Russia, the United States, Thailand, and many more.


                                    Thursday, October 17, 2013

                                    How to Plant a Vegetable Garden

                                    Planting a vegetable garden outside your back door is a rewarding experience. By cultivating and planting your own garden, you can plant the vegetables you like and nurture them without pesticides or other harmful agents. If you have kids, you can teach them how to plant a vegetable garden and how to care for plants. At dinner time, your family will be rewarded with the freshest vegetables possible. Does this Spark an idea?

                                    Instructions

                                      1

                                      Make a list of vegetables that you want to grow. Be sure that your list includes vegetables with various harvest seasons so that you have a constant supply of fresh veggies.

                                      2

                                      Map out your garden on paper. On your map, indicate where each vegetable will be planted in your garden. Place vegetables needing full sunlight in sunny areas. Vegetables needing less light should have some shade.

                                      3

                                      Prepare your soil by checking to be sure that the soil is loose and free of rocks. You can enhance your soil by adding organic matter, lime and some commercial fertilizer.

                                      4

                                      Dig your trenches for each row, but be sure to leave enough room so that you can walk between the rows without stepping on your plants.

                                      5

                                      Plant your seeds according to the instructions on the seed packet label. You may need to use a ruler to be sure that you are placing the seeds in the ground at the appropriate depth.

                                      6

                                      Cover the seeds with dirt carefully and then pat down the dirt to hold in the moisture.

                                      7

                                      Mark your seeds with a marker so you know where things are planted in the garden.

                                      8

                                      Monitor your garden and water according to the requirements for each individual plant.